Showing posts with label Paint. Show all posts

Wednesday, February 24, 2010

How I Get My Paint On

A few weeks ago Allan and I spent the weekend painting my dressing room.  Now, I don't often toot my own horn, but I'm a pretty darn good painter.  And I love it, painting is very relaxing to me.  And the best thing about painting is the end result which is always so amazing.  Painting is definitely the cheapest way to transform a room!  

Along the way I've picked up a few helpful tricks.  So, I thought I'd share a little something my dear mommy taught me long ago.  It all starts with this...


Yep! A gallon of milk.  Now, Allan is definitely the el-cheapo one in our relationship but there are definitely some things I refuse to spend my pennies on.  For example, this Handy Paint Pail, $9.87 at Lowes.
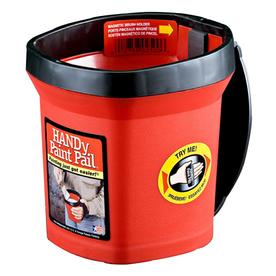
 
 Picture from Lowes.com

Whhaaatt?? Almost ten buckaroos for a little bucket that is just going to get filled with paint???   I don't think so.  That money could be spent much better at Home Goods!  So here is my solution.  Take a gallon of milk (or any other gallon beverage) and drink it all up, 'cause I don't like to waste.  Once your belly is full and the plastic gallon is empty, take a pair of sharp scissors and cut around the spout, down the side of the jug stopping about half way.  Continue over then back up to your original starting point.  Just be sure to leave the handle intact.


Your finished product should look like this.  Easy peasy right?  Finally, just fill 'er up with paint and you are set to go.  


Now I know my paint pail doesn't come with a magnetic brush keeper or a paint scrapper like this one, but it definitely gets the job done.  Costing you zero dollars and zero cents (aside from what the milk cost you, which you most likely would have bought either way).  

So there you have it! Your own super duper, super cheapo, handy paint pail!

Friday, February 12, 2010

My New Chalkboard

I cannot wait to share my most recent project with you - my new chalkboard!  I am a very bad blogger and didn't take pictures along the way, I apologize.  But I'll fill you in on the nitty gritty details.  I knew I wanted to "recycle" a frame I had from our old place.  The frame was gorgeous but the print that was previously in the frame wasn't really our style.  So, I removed the art from the frame, used some glossy spray paint and gave that sucker a good coating of nice, crisp white.  


With some chalkboard paint in hand, I decided to paint directly onto the glass from the old frame (mistake #1) with a brush (mistake #2).  In my defense, my google search on chalkboard painting directed me to use a brush.  Don't listen to google... at least when it comes to using chalkboard paint.    After applying 4 coats and allowing it to dry for 48 hours, it was time to condition the chalkboard.  You do this by rubbing a piece of chalk on its side over the entire surface. This is when I realized the gravity of mistake #2, it made the most horrible nails-on chalk-board sound.  Still, I continued on.  Now it was time to put the glass back in the frame.  Weirdly enough, it didn't fit.  It was as if the wood had contracted.  I applied just a wee bit of pressure and........ crackkkkk.  Yep, the piece of glass snapped into a million pieces. I. was. pissed.

After I cooled off, I thought up Plan B.  I would paint directly on the wall and use the the existing frame to highlight the area.  Genius!  So, I measured out the area I wanted to paint then used some blue painter's tape to section off my chalkboard area.  Chalkboards need to be on a smooth surface so I did a lot of sanding.  Next was the fun part... I got my roll on.  I learned from my first attempt that a nice foam roller would probably work best.  


Three nice, even coats later, it was time to let the paint set before finally conditioning it.  After I was sure it was completely dry, I peeled the painter's tape down to reveal a rectangular black chalkboard.  But I wasn't done yet.  Next, I used some long finishing nails to make sure the frame was perfectly flush against the wall.  Finally, I made sure my creation was perfectly level... let's face it, I'm anal about that type of stuff.


Doesn't the glossy white frame look beautiful with the blueish/grayish color of our laundry room?  Swoon.  And one feature I didn't think of first was that the inside of the frame could act as a shelf for the chalk.


Doesn't my chalkboard look lovely in our laundry room?  I can't wait to doodle and scribble little love notes (Allan hearts poop, hehe).

Monday, January 11, 2010

The Story of an Indecisive Painter

Hi, my name is Wendy and I'm indecisive. Like really indecisive. There, I said it. But when it comes to painting I make normal indecisive me look good. So far my paint sample total has topped off at 18. This does not count the swatches I've brought home from our local Home hardware stores. Want proof of the paint sample madness?


Yeah, it has gotten a little out of control. By far, the most difficult space to pick a color for was the family room/dining room/sun room/hallway. It is all one open space, and the first color you see coming in the house, so picking the perfect color was of the utmost importance. Here is a picture I took a few months ago when I couldn't decide on a color.


When all the samples I brought home were either too light, too dark, too yellow, too brown or too gray, I turned to the handy paint lady at my local H
ome Depot. And guess what y'all? She whipped up the perfect hue for me. Here is how she worked her magic: I showed her the color I liked most but thought was a tad too dark and she adjusted the tint till it was just right. Easy peasy painty squeezy! When I brought home my newest sample and slapped in on the wall, 'cuz I couldn't quite commit to the whole gallon yet, it was love at first sight.


Here is the final color... swoon! I love telling our guests that the color was custom made just for me.


xoxo
Wendy